I love Boss pedals, they are bomb proof, have a great form factor, work well, and look great. They don’t make a couple effects that I like. For example you can’t get a Big Muff in Boss. I had the idea to rehouse some effects in Boss enclosures. Here is the Boss Muff.

Sourcing enclosures
I couldn’t find empty Boss enclosures for sale anywhere so I had to recycle. Boss pedals keep a good resale. It’s hard to find these for less than $40. Often used Boss pedals go for $100 or more. I didn’t want to pay $40 for an enclosure but I wasn’t going to pay $100, especially for something I might want to keep.
After some research on Reverb I found the Boss DS-1 was cheapest. Typically they go for ~$40. The historical prices show sales a range of $25 to $45. Reverb says the estimated price is $25 to $35.
Check out historical sales on Reverb here: Boss DS-1 Distortion (Silver Label) 1994 – 2021
Note! New Boss DS-1 and Boss SD-1 go for about $50. If you have a discount or see a sale it might be good to buy a new pedal since places like Sweetwater offer free shipping.
Watch the shipping! People will ask $15 on average which is really high for something where the asking price is $40. Typically I can mail a pedal for $6 to $10 USPS.

The enclosure and parts
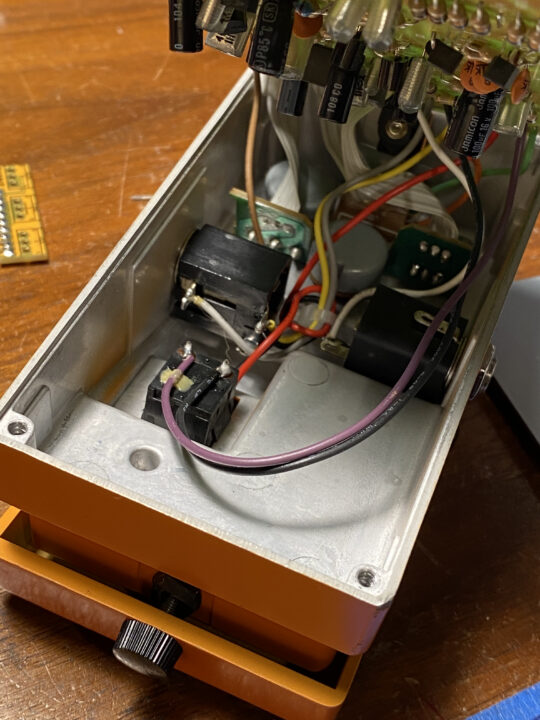
The enclosure is great, it’s pretty spacious, pre-drilled, and it comes with some usable parts. It’s even partially pre-wired!

It comes with jacks, LED, battery clip, a momentary SPST switch, knobs, and some pots. It also comes with a DC power jack but, this was mounted to the original PCB, there will be nothing to anchor it to when I replace the board so I couldn’t use it.

The Jacks are useable and the wiring can be repurposed. There’s nothing special about these jacks. It is interesting the way they fit the enclosure. You don’t need hold them from the inside when you tighten the nut.
The LED is mounted to a small board. I used the LED and board. I just replaced the wires because I needed a little more length. The LED is a typical red 3mm type. Nothing special here.

I usually don’t use a battery but, since the clip was there and partially wired it was easier to just keep it! I wired up the battery snap for this build.
I went with a relay switching system, more on this below, the existing switch worked well for this! I left the existing switch in place along with the wires.
The pots from the DS-1 were B100k, B100k, and B20k. Since I was building a Big Muff I needed 3 x 100k pots. I kept two of the original pots and replaced the 20k pot with a A100k pot. The two B100k pots were 16mm and B20k was a 9mm pot with pins at 90 degrees. It looks like you could fit 3 x 16mm pots but I didn’t test this theory and just brought another 9mm pot.

All of the pots had a small PCB with a ribbon cable running to the main PCB. I used these small boards and the existing ribbon cables.
Note! The ribbon cables use thin solid core wires. These seem like they would break easily but Boss glues both ends to their respective boards with some kind of industrial glue, maybe epoxy. I took their lead and glued the end of the ribbon cable to the PCB with some gorilla glue. The glue anchors the end of the wire where it’s prone to breaking.

Small PCBs mounted to pots 
Ribbon cables glued to PCB
They did the same with the DC jack, this type of jack is prone separating from the board on other pedals, I’ve fixed a few of these in the past. Not on Boss pedal! The jack is soldered then glued to the board! I’m surprised other manufacturers haven’t caught on to this.
I reamed the enclosure to fit a standard DC jack. I used a couple of those plastic washer to keep the jack from extending too far out of the enclosure.
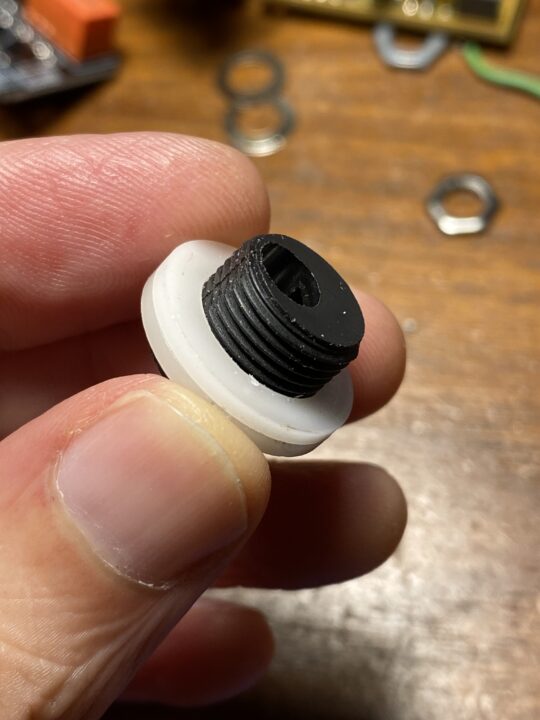
Add some washers 
Ream the enclosure 
Mounting the DC jack 
Adding the DC Power jack to the Boss enclosure
The knobs are nothing special. They use splined knobs rather than knobs with a set screw. I kept the pots so I kept the knobs. I had to get a new knob for the replaced 9mm pot since I couldn’t get a 9mm pot with a splined shaft or at least a 9mm pot with 90 degree pins with a splined shaft.
Switching
Boss uses an electronic switching system paired with a buffered bypass. Seems like you could use this some how. This might be a future project…
For this project I decided on something I could more easily understand. I went with a relay switching system. This is an electronic DPDT that includes a circuit that also handles the LED. The system uses a Microcontroller that tracks the SPST, powers the LED and switches the relay.

I went with the Madbean pedals Softie system. It has some good features. It is also true bypass. The effect path through the relay is essentially a wire connection all the way through. A nice feature of the Softie is if the power goes off it switches to bypass. The relay has an estimated failure of 100k clicks so it should outlast a stomp switch.
I chose the Softie 2 board. Madbean offers three PCB versions 1, 2, and 3. The Softie 2 is made for 1590B sized boxes. I thought this would good but I wasn’t thinking in 3D. This board mounts parts on both sides which makes it taller even though the footprint is smaller than the other boards. I still made it work but, a wider flatter board, with all the parts on one side, would work better in this enclosure.

Softie PCB and relay 
Softie PCB
The Softie works well. Assembly is easy. Some of the parts you’ll need to order from Mouser so it won’t be as cheap as a 3PDT switch. Wiring is easy. Overall I’d recommend this for other projects.
Cost estimate
| Item | Cost |
| Used Boss DS-1 | $40 |
| Madbean Rabbit Hole PCB | $6 |
| Madbean Softie PCB | $4 |
| Relay 80-EC2-4.5NU | $2 |
| Other parts | $5 |
| total estimate | $57 |
But What about the finish?
I didn’t paint the enclosure. This would have added a lot of time, cost, and effort to the project. Admittedly it would have looked far more amazing when it was finally finished. I was not super excited to try and peel off that rubber pad on the foot switch and glue it back on. You might be able to mask this. Also sanding the enclosure did not inspire me.
I think I might just slap a label on this to remind me what’s in the box. As it is the existing labels: Tone, Level, and Dist work for the Big Muff. Though the arrangement is not what I would have done. The small center knob is Level. Intuitively I reach for the upper left when I want to adjust the Volume. Sounds!
Here is a short video clip of a stock Boss DS-1 next to the Boss Muff. I built the Boss Muff to the spec of a Green Russian Big Muff. Not sure if I made a mistake or if it’s the nature of the green Russian but it has lots of bass. This would be great for bass.
Conclusion
So was it worth it? The whole process was easier than I thought it would be. The cost was higher than building other projects but not as high as I thought it might be. Reusing parts from the DS-1 saved on costs for pots, jacks and knobs which are some of the more expensive parts.
I could have shaved the costs down if I could have traded for a Boss pedal or watched Reverb for a couple weeks looking for a deal. I just bought the cheapest DS-1 I saw and paid the asking price. Besides waiting for a $25 DS-1 to show up on Reverb and then see $15 shipping is a little anticlimactic.
Overall the experience was informative. I think I enjoy having the rehoused Big Muff. I’ll probably use this pedal. The process revealed some of the tech used by Boss in their pedals. I’m definitely going to do a follow up…
Check out this Make Guitar Podcast where we talk about building the Boss Muff:


[…] Big Muff […]